What is Ventoy?
Ventoy is an open-source application for creating bootable USB drives for ISO/WIM/IMG/VHD(x)/EFI files.
Unlike similar applications that require reformatting every time you change the ISO/WIM/IMG/VHD(x)/EFI file, Ventoy does not require reformatting when changing files. If the USB flash drive has a large capacity, you can store many files on it, and Ventoy will display all these files in the Ventoy boot menu.
Features:
- Supports ISO/WIM/IMG/VHD(x)/EFI files
- No need to reformat when changing operating systems or files, thus extending the lifespan of the USB flash drive
- Can hold many files or operating systems, which will appear in the Ventoy boot menu
- Supports x86 Legacy BIOS, IA32 UEFI, x86_64 UEFI, ARM64 UEFI, and MIPS64EL UEFI
- Supports almost all types of operating systems (Windows/WinPE/Linux/ChromeOS/Unix/VMware/Xen…)
- Over 1000 images tested
- More than 90% of distros on Distrowatch can use Ventoy
For more features, visit the official website at
Ventoy.
How to install Ventoy to a flash drive or removable storage
Download Ventoy using the button/link above. Choose the installer for Linux. Extract the tar.gz file.
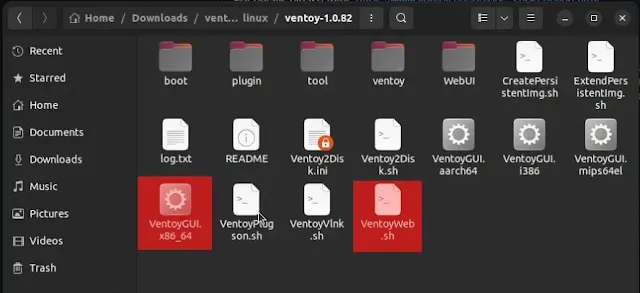
The image above shows the files inside the Ventoy tar.gz file. Let’s discuss the installation via the web. For installation using the GUI, simply double-click VentoyGUI x86_64 if you are using a 64-bit processor, which is common nowadays. Or VentoyGui i386 for those still using a 32-bit processor.
For web-based installation, VentoyWeb.sh can be executed as an application. If it cannot be used yet, type this command:
sudo chmod +x VentoyWeb.sh
Then
sudo ./VentoyWeb.sh
Then the result will appear as shown below.
Open through the browser using the URL starting with http://127.0.0.1:(port). Adjust the port according to the result shown in your terminal.
It will appear in the browser as shown below. The interface looks similar to the GUI.

Simply change the flash drive's name to match the one on your device in the Devices section and click the Install button. Usually, there will be two warning dialogs. Click OK twice or double-check if the parameters are correct.
At this stage, the installation of Ventoy on the flash drive is complete. The next step is to add the Linux ISO image to the flash drive.
Usage and Conclusion
After completing the above steps, the flash drive will have two partitions. The EFI partition will not be visible in the file explorer. The second partition will appear as a flash drive or removable disk in the file explorer with the label Ventoy. Now, add the Linux ISO files to the flash drive. You can add more than one ISO file as long as the flash drive has enough capacity.
Additionally, with Ventoy, you do not need to reformat the flash drive if you want to change the ISO installer file. Simply add or delete the ISO file on the flash drive and replace it with another ISO installer. For example, if you have a Ubuntu ISO and want to try Fedora but the flash drive is full, just delete the Ubuntu ISO file and replace it with the Fedora ISO file. This makes it easy to switch between different live CDs or use the flash drive as an installer. Ventoy supports not only various Linux ISO images but also ISO images of other operating systems.


